 The internet runs on text, but pictures are worth a thousand words, they say. If you look at your post in the HTML view, all you’ll see is text and code. To display pictures, the trick is to store them separately as picture files and use some HTML code to get your browser to display them in your post or page. Don’t panic – WordPress automates this process so you don’t have to mess with code.
Here is how you do it
1. Make sure you are looking at the Add new post (page)or Edit post (page) page on your dashboard.
2. Make sure you are in Visual view
3. Park your cursor where you want the picture to appear.
4. Click on the Upload / Insert icon just above the text icons.
 By the way, in the latest version of WP you can use this icon to insert some other types of file, such as Word or Pdf, to “attach” them, so your readers can download them.
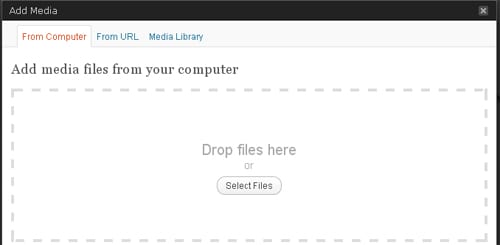
5. Now you will see a new window called Add Media, which allows you to locate and select the picture file you want. In general, these files will have to have .jpg (“j-pegs”) or .png extensions because browsers support these file formats.
 You will notice that you can add the picture from your computer, from another URL or from your media library. Your media library is automatically updated every time you insert a picture. (You can also explore the library by clicking on the [media] option on the left hand dashboard menu.)
5. When you have selected a file, you will see that you can do quite a lot of things, such as control the size of the picture, choose where it is displayed or what text appears when your reader’s cursor hovers over it. It also allows you to control what happens if your reader clicks on it. There are also some basic picture editing tools. Explore all the options.
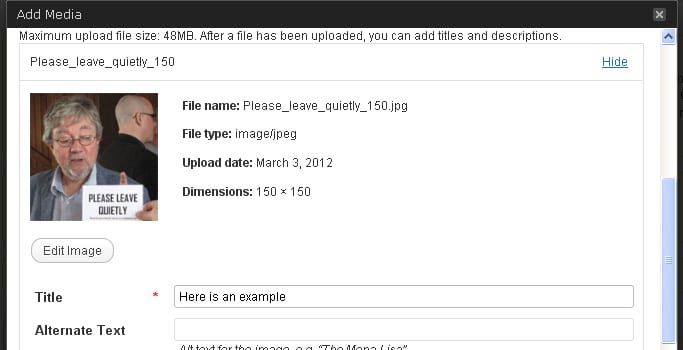
Here is the top half of what you can now see in the Add Media window:
 Notice that I have typed in my own title. The default entry in this box will be the file name, which is useful for you as it allows you to trace the source, but I think it can be pretty annoying for your readers. You can use it to convey some information, because it also appears when your reader hovers over the picture.
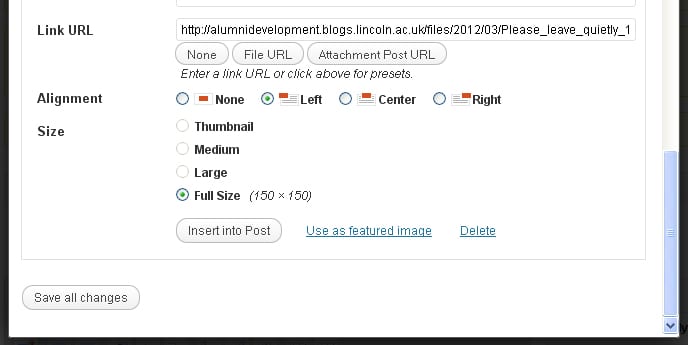
Here is the bottom half of the same window:
 The best way to understand what you can do here is explore and experiment, especially with the Alignment choices. They seem simple enough, but do make sure your choice does give you what you intend, as different themes may interpret them differently, in terms of word flow.
Spend time on the Link URL box. The default entry you see here is the location of the file itself, so if your readers click on the picture it will appear by itself on it’s own page, and they can download it by right-clicking. Try it now.
Or, instead of accepting the default URL, you can paste in another URL (e.g. from the top of your browser) to turn your picture into a picture link to another website. Or you can choose [none] to make the picture unresponsive to clicking.
Here is an example of a picture link, linking to the gallery page of LSM Alumni blog.
And here is the target URL in the Add Media window. (You must include the http:// bit.)
You may notice that when you click on the gallery picture link, the web page appears either in a new window or as a new tab, depending on your browser. WordPress unfortunately does not offer this option, so here is where the buck stops; if you want to do this, you will have to resort to some HTML. The code to insert is: target=”_blank”, and here is how you use it:
1. Go to the HTML view
2. Find the code that inserts the picture . It looks like this:
And here is how it looks when you insert the new window code, after the link reference:
Some notes of caution:
Picture files are much bigger than text, and because they are stored in the same place as your posts and pages, they eat up your allocated space on the server. The only reason for inserting a picture file that is wider than your column is if you want readers to be able to download it full size. In this case, some themes, such as this one, will automatically reduce the size of the picture as it appears in the post, but not the file itself.
Picture quality is also important. If you are used to creating and managing picture files, all the normal rules apply, but bear in mind that large high-resolution files are a waste of space if they exceed your screen resolution, so use an image management application like Photoshop to reduce their size to fit your column width.
Equally it’s not a good idea to “blow up” very low resolution (fuzzy) images; they will only look worse.
Don’t forget to preview your post after you have inserted a picture. Never trust what you see in the Visual view.


